

How to connect your domain to your WordPress site
You may have created a website through WordPress and would like to connect your Afrihost domain to your WordPress site.
You can use one of the following methods to connect your domain:
- Connect via Name Servers. (Recommended)
- Connect via Pointing.
Both methods require an upgraded WordPress plan and is not available on the free plan.
Add your domain to your WordPress account
Before connecting the domain via Name Servers or via Pointing you need to add the domain to your WordPress account.
- Go to the WordPress Domains page.
- Select ‘My sites’.
- Select ‘Upgrades’.
- Select ‘Domains’.
- Select ‘Add Domain’.
- Select ‘Use a domain I own’.
- On the next screen select ‘Map Your Domain’.
- Enter the domain name.
- Click ‘Add’.
1. How to connect via Name Servers
Connection via Name Server (NS) means WordPress hosts your DNS records so you can manage them on your WordPress account, while Afrihost remains the domain registrar. The Name Servers will need to be updated in ClientZone.
NS = Name Server record. This shows which nameservers are currently being used for your domain. Name servers answer DNS queries for a DNS zone. There are multiple DNS servers for a single domain so that name resolution works even if one DNS server fails.
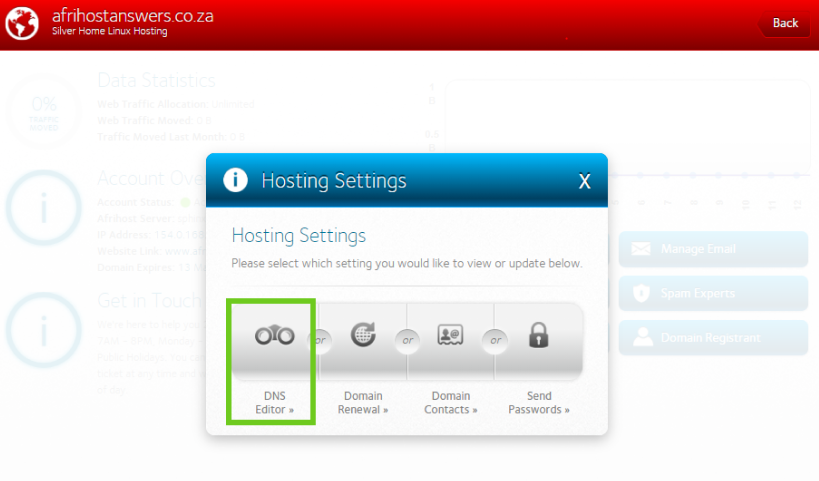
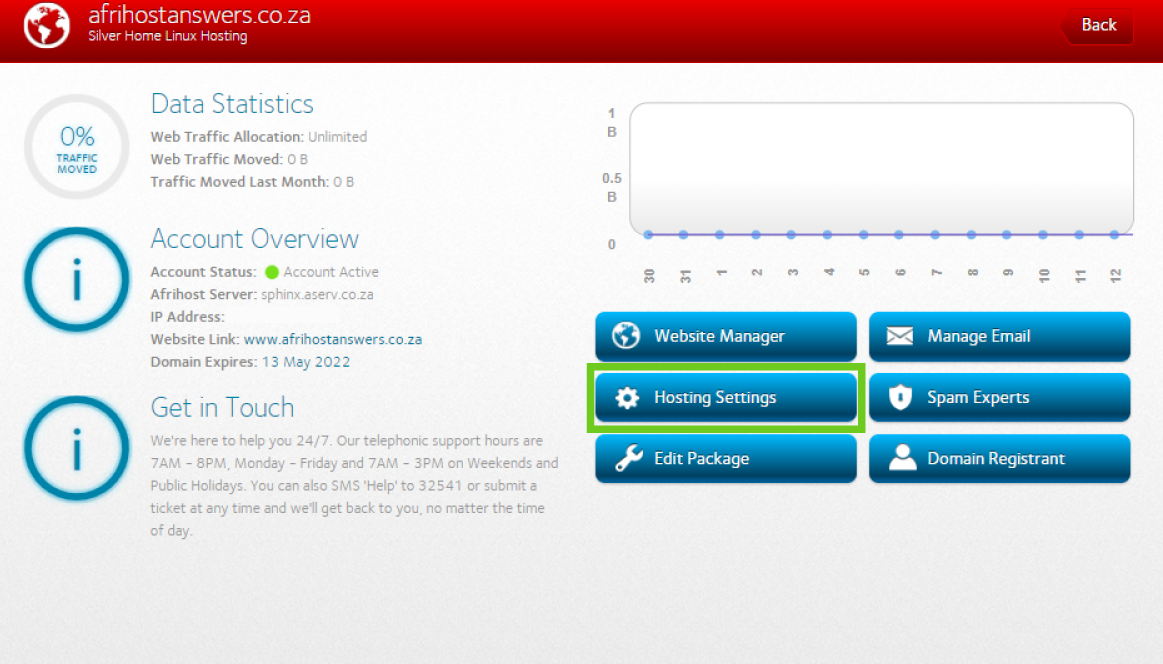
- Login to ClientZone.
- Click on the ‘Hosting’ tab.

- Select the domain you want to connect to your WordPress website.

- Select the ‘Hosting Settings’ button.

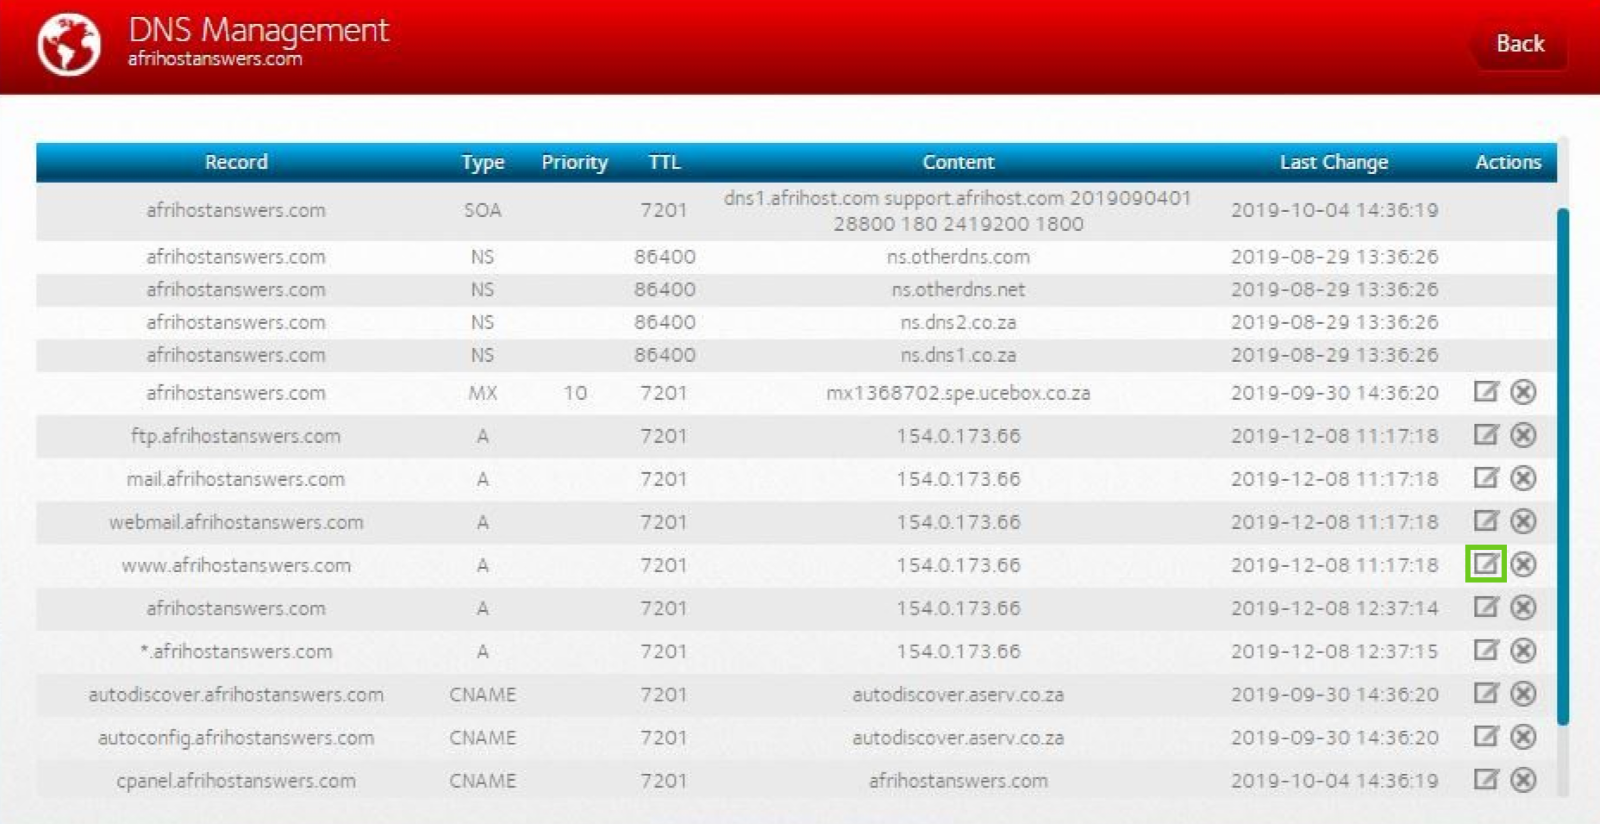
- Select ‘DNS Editor’.
- Click on the ‘edit icon’ of the first NS record to open all the NS records to be edited.
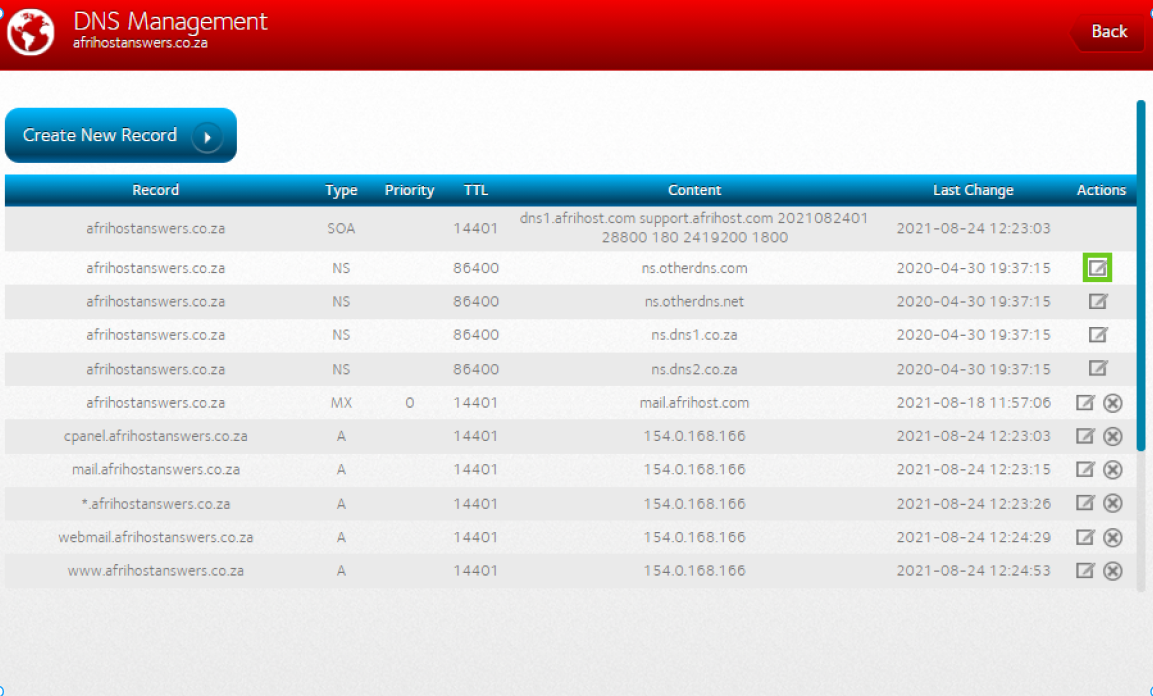
- Delete the current NS records.
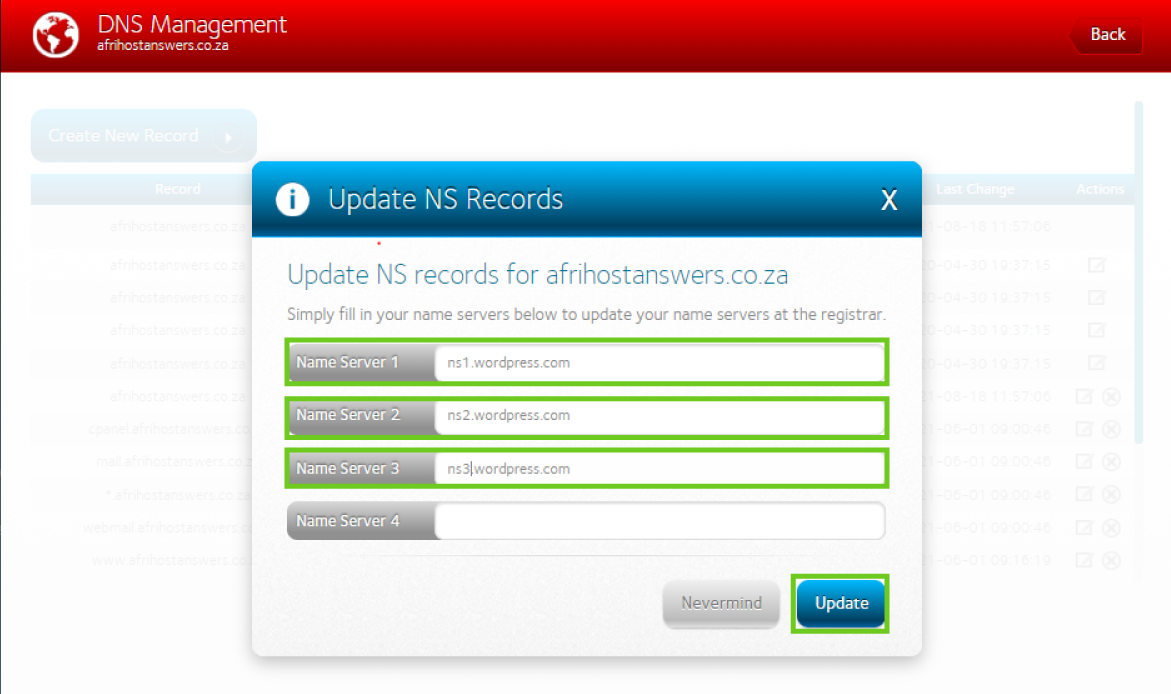
- Enter the WordPress NS records.
WordPress name servers:
ns1.wordpress.com
ns2.wordpress.com
ns3.wordpress.com
- Click 'update'.
Please allow 24 -48 hours for the Name Servers changes to propagate.
Create an MX records on the WordPress dashboard
If you have e-mails hosted on this domain, the MX record will need to be added to your WordPress dashboard after changing the NS records. This will ensure that the e-mails continue working after changing the NS records.
If you would like to know How to edit DNS records please read our Help Centre article for assistance.
Find the MX record in ClientZone DNS menu.
- Login to WordPress dashboard.
- Select ‘My sites’.
- Select ‘Upgrades’.
- Select ‘Domains’.
- Select ‘Change your name servers & DNS records’.
- Select ‘DNS Records’.
- Remove any old records that are no longer needed.
- Click on ‘Ad new DNS record’.
- Click ‘Add New DNS Record’.
Once the new MX record is successfully created it will show on the DNS Records list.
2. How to connect via Pointing
Connection via pointing means Afrihost will host your domain's DNS records and you can manage your DNS records via Afrihost ClientZone.
The IP addresses can change without notice; this is why Name Servers is the preferred connection method.
Step 1: Get the A records from the WordPress dashboard
- Login to your WordPress Dashboard.
- Select ‘Upgrades’.
- Select ‘Domains’.
- Click on the domain.
- Select ‘Alternative setup using root A records’ to see the A records of your site.
- Mycooldomain.com IN A 192.0.78.137
- Mycooldomain.com IN A 192.0.78.24
Step 2: Update the A records in ClientZone
- Login to ClientZone.
- Click on the ‘Hosting’ tab.

- Select the domain you want to connect to your WordPress site.

- Select the ‘Hosting Settings’ button.
- Select ‘DNS Editor’.

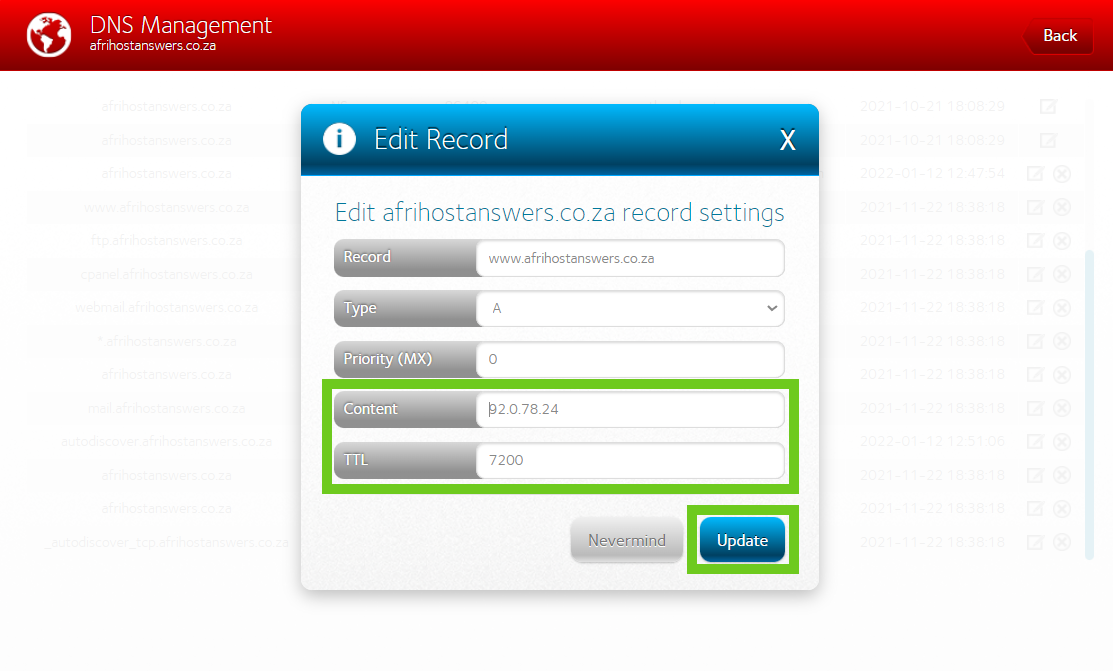
WordPress will give you two IP addresses.
One is used for the www A record and the other one is used for the domain name A record.
- Select the 'edit icon' next to the www.yourdomainname.co.za A record.
- Edit the ‘www.yourdomainname.co.za’ A record.
- Replace the current IP address with the WordPress first IP Address.
- Change the ‘TTL’ to 7200.
- Click ‘Update’.
- Select the 'edit icon' next to the yourdomainname.co.za A record.

- Edit the yourdomainname.co.za A Record.
- Replace the current IP address with the WordPress second IP address.
- Change the TTL to 7200.
- Click ‘Update’.
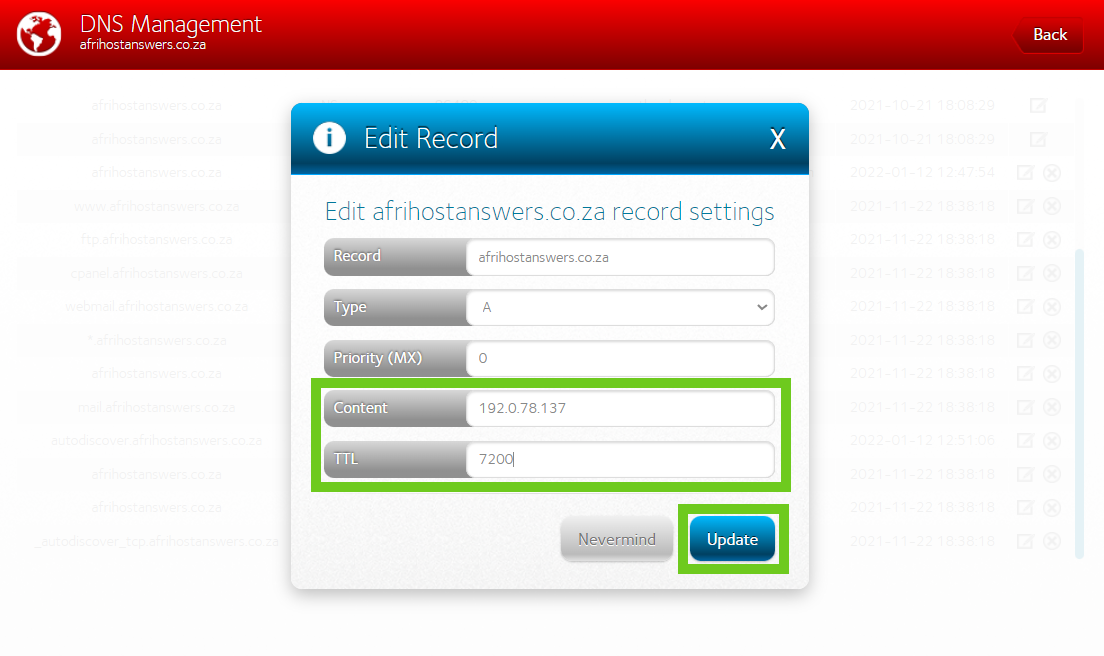
A pop-up message will come up confirming that the DNS has been updated successfully.
Please allow 2 - 24 hours for the changes to take effect.
If you would like to know How to connect your domain to WIX please read our Help Centre article for assistance.
If you would like to know How to connect your domain to Shopify please read our Help Centre article for assistance.