

Understanding cPanel ELevate
The cPanel ELevate Project helps upgrade servers from CentOS 7 to AlmaLinux 8 without reinstalling, ensuring continued compatibility with the latest cPanel versions. This is important since CentOS 7 is no longer supported. The Elevate tool automates the upgrade, preserving settings and data. However, the process requires careful planning, backups, and post-upgrade checks..
Prior to initiating the upgrade, it is strongly recommended that administrators create full system backups and where possible snapshots to allow for seamless recovery in the event of a failure.
The upgrade must be performed via a terminal session with root-level SSH access to the server. During the upgrade process the system will undergo a reboot and may be temporarily unavailable until the procedure completes successfully.
The ELevate process
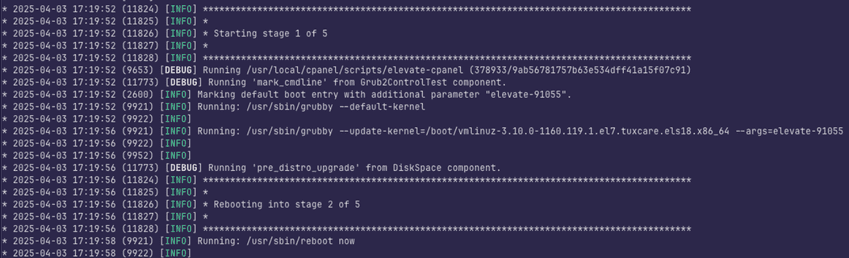
The cPanel ELevate project begins by checking for any blockers before starting the upgrade. The upgrade process is divided into multiple stages, with the server rebooting between each stage and performing a final reboot upon completion.
Stage 1
- Installing the cPanel ELevate service.
Stage 2
- Upgrade the systems distribution packages and disable cPanel related services (if necessary).
Stage 3
- Setup the ELevate repository, updates cPanel packages, remove conflicting ones and back up the system configuration.
The backup excludes system data but may include configuration details for:
- cPanel(upcp)
- EasyApache 4
- MySQL or MariaDB
- Perl/PECL binaries from distribution
The system may prompt you to answer some questions before proceeding.
Stage 4
- Perform the distribution upgrade and reinstall any previously removed packages.
Stage 5
- Complete the process by verifying the upgrade and cleaning up the environment, including removal of the cPanel ELevate service.
For detailed instructions and to initiate the upgrade, refer to the ELevate Your Server documentation.
If you would like to know How to access your Self-managed Cloud server please read our Help Centre article for further assistance.
Pre-Upgrade Procedure Using cPanel ELevate
Step 1: Assess Website Compatibility and Required Services
- Evaluate hosted websites and applications for compatibility with the target OS version. Determine whether Imunify360 is necessary this is typically only required if a website depends on a older PHP versions (e.g., PHP 7.4 or higher) and cannot function on an older version.
Note: Imunify360 is not the same as ImunifyAV and may not be installed on all servers.
Additionally, MySQL will be upgraded as part of the elevate process. It is strongly recommended to back up all databases before proceeding.
Step 2: Remove Non-Standard cPanel Software
- Uninstall any third-party or non-standard cPanel integrations NGINX/ Engintron to prevent conflicts during the upgrade. These components can be safely reinstalled once the process is complete.
Step 3: Confirm Backup Strategy (for Self-Managed Servers)
- If the server is self-managed and does not utilize R1 Backups or another automated backup solution, ensure that reliable backups including system files, configurations, and databases are in place.
If you require further assistance, please see the various Afrihost Help Support Channels available to you.
Step 4: Pre-Upgrade Preparation
- Address known blockers or compatibility issues based on previous ELevate runs. This may involve adjusting system configurations or removing conflicting packages.
Step 5: Run ELevate --check
- Execute the elevate --check command to identify upgrade blockers. Follow the output guidance to resolve any issues prior to initiating the actual upgrade process.
Step 6: Initiate the Upgrade Process
- Begin the upgrade by executing the elevate script. Note that system access may be limited during the process.
Avoid administrative changes or multitasking during the upgrade.
Step 7: Monitor the Upgrade Process
- The server will reboot multiple times. For detailed output, append the -log flag to the ELevate command.
- At Stage 3, the process may halt with an actionable error, follow the instructions and resume using and continue.
- At Stage 4, a reboot typically occurs; if the server seems unresponsive, check the console. Activity should still be visible, and allow it to be completed without interruption.
Force rebooting the server when it appears unresponsive may result in the server becoming unusable. Proceed with caution and ensure all other recovery options have been considered first.
Step 8: Post-Upgrade Validation
Once the upgrade concludes:
- Verify website functionality and performance.
- Test webmail access and email services.
- Reinstall and configure third-party services like NGINX/Engintron if needed.
Elevation Preparation Guide: System and Compatibility Validation
Server Checks (Step 1–3)
Verify OS Compatibility
- Important: CentOS 6 cannot be elevated.
Validate PHP Compatibility
- Ensure all hosted sites are compatible with PHP 8.2.
- Note: AlmaLinux 8 requires a minimum of PHP 7.4. Versions earlier than this will require Imunify360.
Inventory PHP Versions Across Domains
- Generate a list of all domains and subdomains by their PHP version:
for file in /var/cpanel/userdata/*/*; do domain=$(basename "$file"); [[ "$domain" == "main" ]] && continue; phpver=$(grep 'phpversion:' "$file" 2>/dev/null | awk '{print $2}'); [[ -n "$phpver" ]] && echo "$phpver $domain"; done | sort -urV | awk '{print $2 " => PHP " $1}'
whmapi1 --output=json php_get_vhost_versions > /root/php_get_vhost_versions.json
To see versions of php a domain is using can be seen in WHM under MultiplePHP manager as well.
Check Root Disk Space
- Ensure 5–10 GB of free space is available on the / partition to avoid migration issues.
Check /boot Disk Space
- Ensure at least 200 MB is available. Remove old kernels if needed.
Verify Disk and RAID Setup (only applicable to physical servers)
- Important: Servers using BIOS RAID cannot be elevated.
- If only one disk shows, it could indicate a disk failure or BIOS-level RAID configuration.
- Check with the following commands:
lsscsi
lshw -class disk
cat /proc/mdstat
Check Partition Table Type (only applicable to physical servers)
Servers with a GPT partition table and a locked MBR cannot be elevated.
To check:
[root@localhost~]# parted /dev/sda print | grep -i '^Partition Table'
Partition Table: msdos
[root@localhost~]# fdisk -l /dev/sda | grep -i "Disk label type:"
Disklabel type: dos
# How to check if MBR is locked
hdparm -r /dev/sda note: You might have to install hdparm
/dev/sda:
readonly = 0 (off) note: If the output says "readonly = 1", then MBR is locked
Disable Nginx/Engintron
- Run the following to remove or disable:
engintron disable ; yum -y remove nginx ea-nginx
Verify Backups Exist
- Ensure recent and complete backups are in place before proceeding.
Check out guide for step-by-step instructions.
Repair Databases & Create SQL Dumps
- Run DB repair and generate mysqldumps (run script twice):
mysqlcheck --all-databases -r
Create cPanel Account Packages
- If space is fine, proceed: Create cPanel packages of accounts.
Backup Mail Configurations
- Archive essential mail config files:
cd /etc/
tar -zpcvf /root/etc_mail_config.tgz exim.conf.local exim.conf.localopts exim.pl.local localaliases localdomains valiases domainusers trueuserdomains userdomains userdatadomains
cd
Server Prep (Steps 4–6)
- These steps address common blockers detected by the Elevate script and help clean up unnecessary packages and configurations to ensure a smooth upgrade.
Remove Debug Information Packages
- Check for debug RPMs and remove them if found:
rpm -qa | grep debuginfo
rpm -qa | grep debuginfo | xargs yum -y remove
Enable Overlay Module at Boot
- Required for Elevate compatibility:
echo overlay > /etc/modules-load.d/overlay.conf
modprobe overlay
lsmod | grep overlay
rmmod btrfs
Remove Solr
/usr/local/cpanel/scripts/uninstall_dovecot_fts
yum remove -y java-1*
Remove Unnecessary Packages
Remove Unnecessary Packages - such as puppet, legacy leapp, and outdated PHP versions (from ea-php56 up to ea-php73):
rpm -qa | grep leapp-data | xargs yum -y remove
for version in 56 70 71 72 73 ; do rpm -qa --qf '%{NAME}\n' | grep -E "^ea-php${version}-|^php${version}-" | xargs -r yum -y remove ; done
rpm -qa | grep ea-php56 | xargs yum -y remove
Ensure SSH Root Access
echo 'PermitRootLogin yes' >> /etc/ssh/sshd_config
Fix AutoSSL Configuration
agreement=$(whmapi1 get_autossl_providers | grep "x_terms_of_service:" | awk {'print $NF'})
whmapi1 reset_autossl_provider provider='LetsEncrypt' x_terms_of_service_accepted "$agreement"
Fix GRUB2 Configuration
yum install -y grub2-pc
grub2-mkconfig > /boot/grub2/grub.cfg
Disable SELinux
sed -i 's/^SELINUX=.*/SELINUX=disabled/' /etc/selinux/config
rm -fv /.autorelabel
Clean Up Unused Repositories
rm -vf /etc/yum.repos.d/patchman.repo
rm -vf /etc/yum.repos.d/nginx.repo
yum-config-manager --disable EA4-experimental-c7
Update System and cPanel
- Ensure the server is running the latest stable version of cPanel & WHM supported by your OS.
- Note: CentOS 7 and CloudLinux 7 only support cPanel & WHM version 110.
/usr/local/cpanel/cpkeyclt
yum install -y deltarpm
- Ensure boost169-program-options is installed
rpm -q boost169-program-options || (yum remove -y epel-release && yum install -y https://archives.fedoraproject.org/pub/archive/epel/7.9/x86_64/Packages/e/epel-release-7-12.noarch.rpm &&
yum install -y boost169-program-options)
yum update -y
- Verify if cPanel is set to release tier
grep "CPANEL=" /etc/cpupdate.conf
- To update to cPanel release tier then run cPanel updates
sed -i 's/^CPANEL=.*/CPANEL=release/' /etc/cpupdate.conf ; grep "CPANEL=" /etc/cpupdate.conf
/scripts/upcp --force
/usr/local/cpanel/cpanel -V
Final Step: Reboot and Confirm Console Access
- Now is a good time to verify IPMI or console access is working before rebooting the server.
- Reboot Server
ELevate check (Step 5)
Now it’s time to download and run the latest version of the cpanel-elevate script. Use the following commands:
wget -O /scripts/elevate-cpanel https://raw.githubusercontent.com/cpanel/elevate/release/elevate-cpanel
chmod 700 /scripts/elevate-cpanel
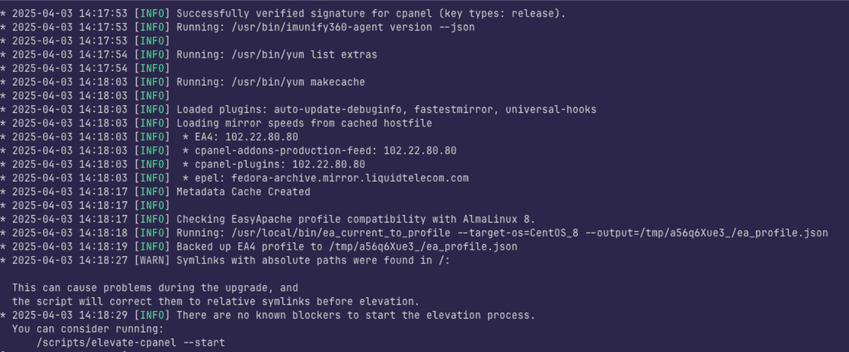
/scripts/elevate-cpanel --check
A good run will look like below:
If you would like to know cPanel Elevate FAQ please read our Help Centre article for further assistance.
Start ELevate once Clear
- Once all checks are clear, initiate the Elevate process with the following command:
/scripts/elevate-cpanel --start --non-interactive
- The server will reboot multiple times during the upgrade. After the server is back online, you can monitor the progress and view logs by running:
/scripts/elevate-cpanel --log
- You may encounter the following error during Stage 3:
During stage 3 you will get this error:
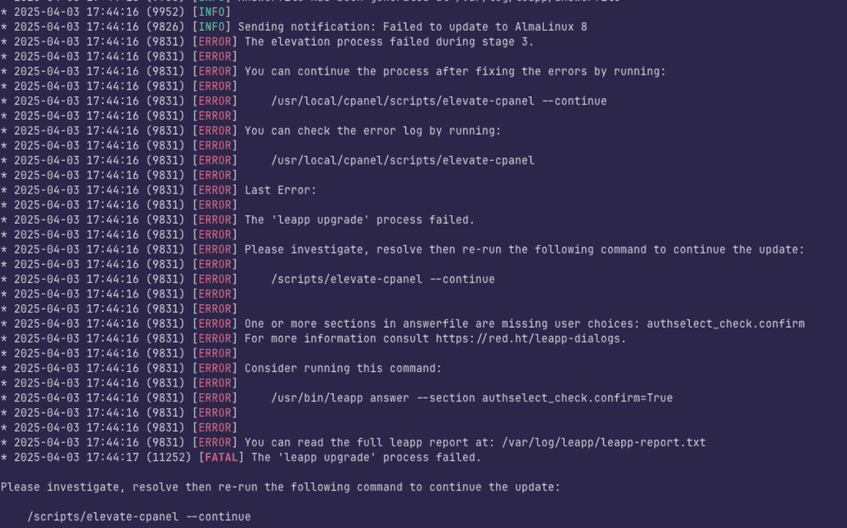
Action Required
- Run the following commands as instructed to proceed with the Elevate process:
/usr/bin/leapp answer --section authselect_check.confirm=True
/scripts/elevate-cpanel --continue
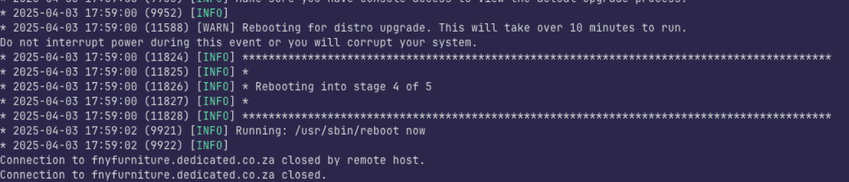
Do not power off the server at this stage. It may appear inactive, but it is still processing. Please check the console for updates.
Restore Mail Configurations
cd /etc/
tar -zxvf /root/etc_mail_config.tgz
/scripts/buildeximconf
/scripts/builddovecotconf
/scripts/restartsrv_dovecot
/scripts/restartsrv_exim
Update cPanel
/scripts/upcp
Resolve HCP Issue (Only Required if R1Soft is Installed and hcp -l Returns No Output)
Remove existing HCP kernel modules:
rm -vf /lib/modules/r1soft/hcpdriver-*
Attempt to retrieve the module:
serverbackup-setup --get-module
Restart the agent and verify:
/etc/init.d/cdp-agent restart
hcp -l